


- Loft Style Living: 15 Ideas for Open, High Spaces
 Loft Style Living: 15 Ideas for Open, High SpacesDiscover how to masterfully structure expansive rooms and high ceilings. With precise zoning, strong material contrasts, and sculptural design stateme...
 - Japandi Living Room: 15 Ideas for Wood & Light-Filled Spaces
 Japandi Living Room: 15 Ideas for Wood & Light-Filled SpacesDiscover the secret to visual serenity: The Japandi style merges Scandinavian coziness with Japanese minimalism. We show you how to create a truly tra...
 - Multifunctional Design Furniture: Make Small Rooms Feel Big
 Multifunctional Design Furniture: Make Small Rooms Feel BigFurnishing small spaces cleverly demands smart solutions. Discover 5 key steps to make versatile furniture expand your home. From rotating beds to pul...
 - Ceramic Dining Table Tops: The Hidden Edge Over Wood & Glass
 Ceramic Dining Table Tops: The Hidden Edge Over Wood & GlassWater rings, scratches, and constant caution? Discover how high-tech ceramic is revolutionizing the dining table. This guide reveals why low-maintenan...
 - Lowboard, Sideboard, or Highboard: The Difference
 Lowboard, Sideboard, or Highboard: The DifferenceLowboard, Sideboard, or Highboard? Learn the exact differences and discover which furniture proportions visually enlarge your space. A compact guide f...


DIY Stone Wall in the Living Room - Step-by-Step Guide
⏳ Reading time: approx. 10 minutes
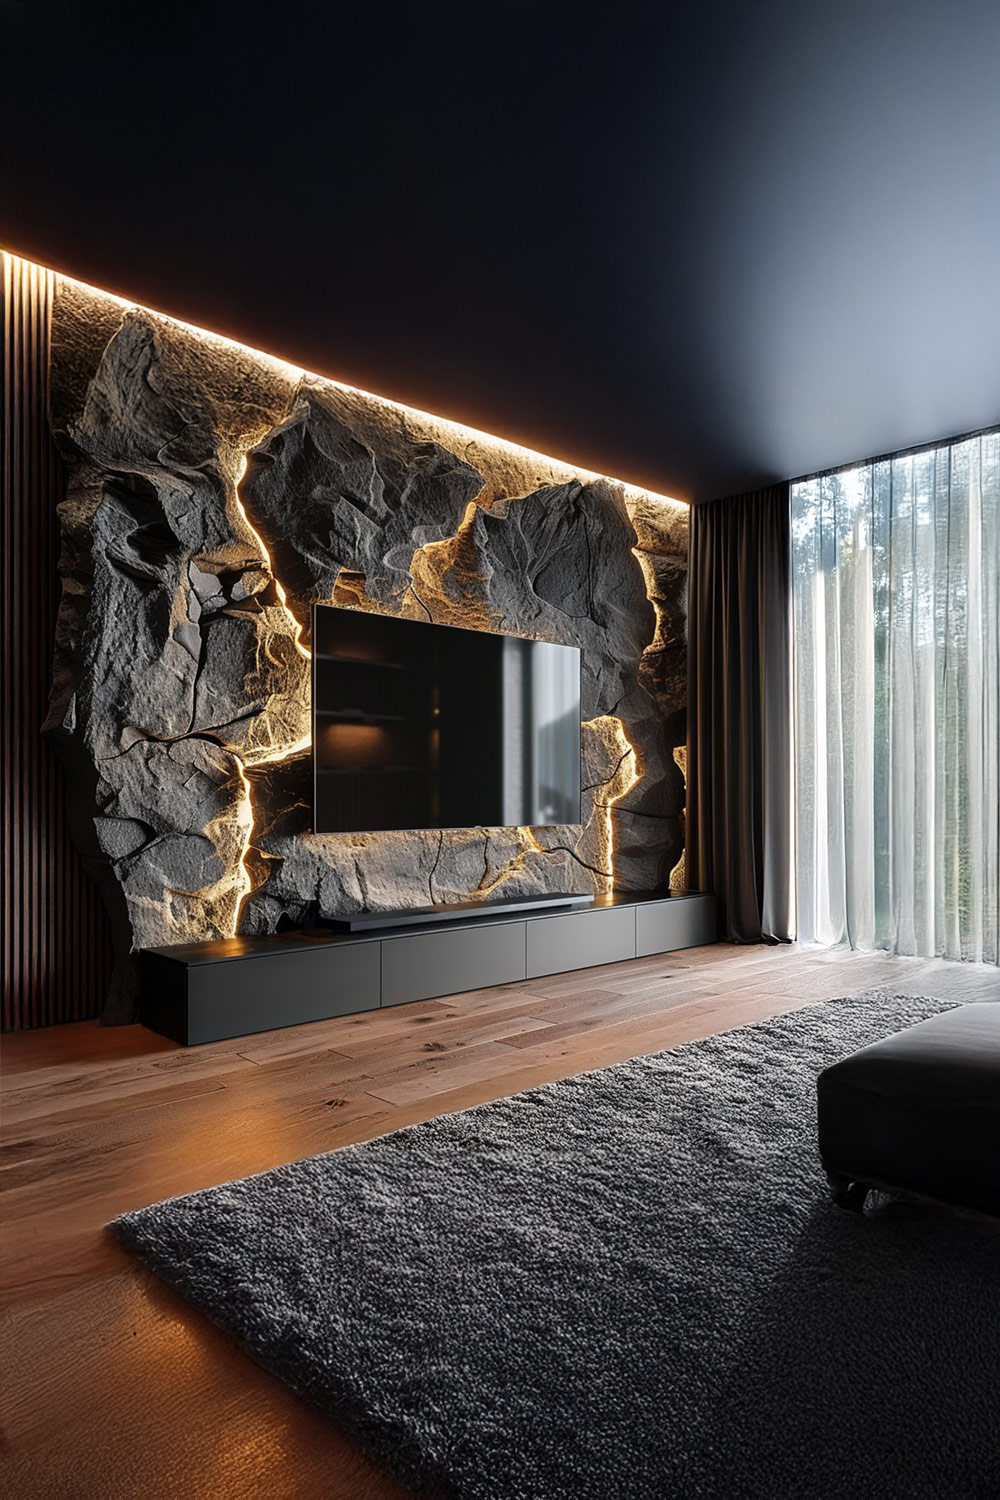
Create a modern accent in your home with a stone wall in the living room. But how do you achieve such a wall design?
Find out in this DIY guide. We explain step-by-step how you can transform your plain living room wall into a spectacular rock face.
Our comprehensive guide, including a material and tool list, will help you complete this exciting project yourself. Let's get started!
An initial overview of the stone wall project
To authentically represent the varying protruding solid rock that characterises a rock face, it is best to use Styrodur panels. Styrodur is easy to process and can be plastered, making it the perfect material for a DIY stone wall in the living room.
Caution: Do not confuse Styrodur with Styrofoam. The latter is too soft and therefore unsuitable. It would not withstand intensive processing.
Essentially, the rock wall project involves the following steps:
- Prime the wall if necessary.
- Prepare Styrodur panels, glue them to the wall, and fix them.
- Prime the entire wall, plaster it, and embed mesh.
- Mix filler with pigment powder and apply in several layers.
- Incorporate texture for an authentic rock face.
- Colour the stone wall again if necessary.
- Seal everything.
So much for the basic concept. We will describe all stages in more detail shortly. We also provide tips on preparations, variations, and ways to visually refine the rock face.
1. Cover the floor
Generously cover the floor in front of the living room wall to be worked on. First, stick a strip of adhesive tape directly in front of the wall on the floor. Then spread out protective fleece and also secure it with adhesive tape.
Tip: If adjacent walls are not to be affected, protect them with foil as well. To do this, apply an adhesive strip vertically along the edge of the wall and then stick the foil onto it. The base adhesive strip makes it easier to apply the foil for optimal protection.
2. Prime the wall with deep primer
Prime the living room wall with deep primer so that the adhesive adheres optimally later. If the wall is already primed accordingly, you can skip this step.
3. Prepare Styrodur panels
In principle, you have two options:
- Purchasing a sufficiently large and thick Styrodur panel, into which you cut at various points to create a rugged rock look.
- Puzzling with smaller Styrodur panels.
We are focusing on the second option here because, in our opinion, it is easier to implement alone and with little experience. How to achieve the whole thing with a large Styrodur panel can be easily deduced from all the information we provide in the rest of this guide.
Manually break some Styrodur panels using your knees to obtain differently shaped rock fragments. This method creates fracture points that already simulate a natural stone structure quite well.
Although many more steps contribute to the rock wall look, the earlier you start processing the panels accordingly, the more authentic the final result will be.
After breaking, use a utility knife to refine the sizes and shapes of the individual rock fragments.
Tip:You can also use a utility knife from the start to create larger and smaller, as well as rock-like structured shapes. This saves effort but is usually more time-consuming.
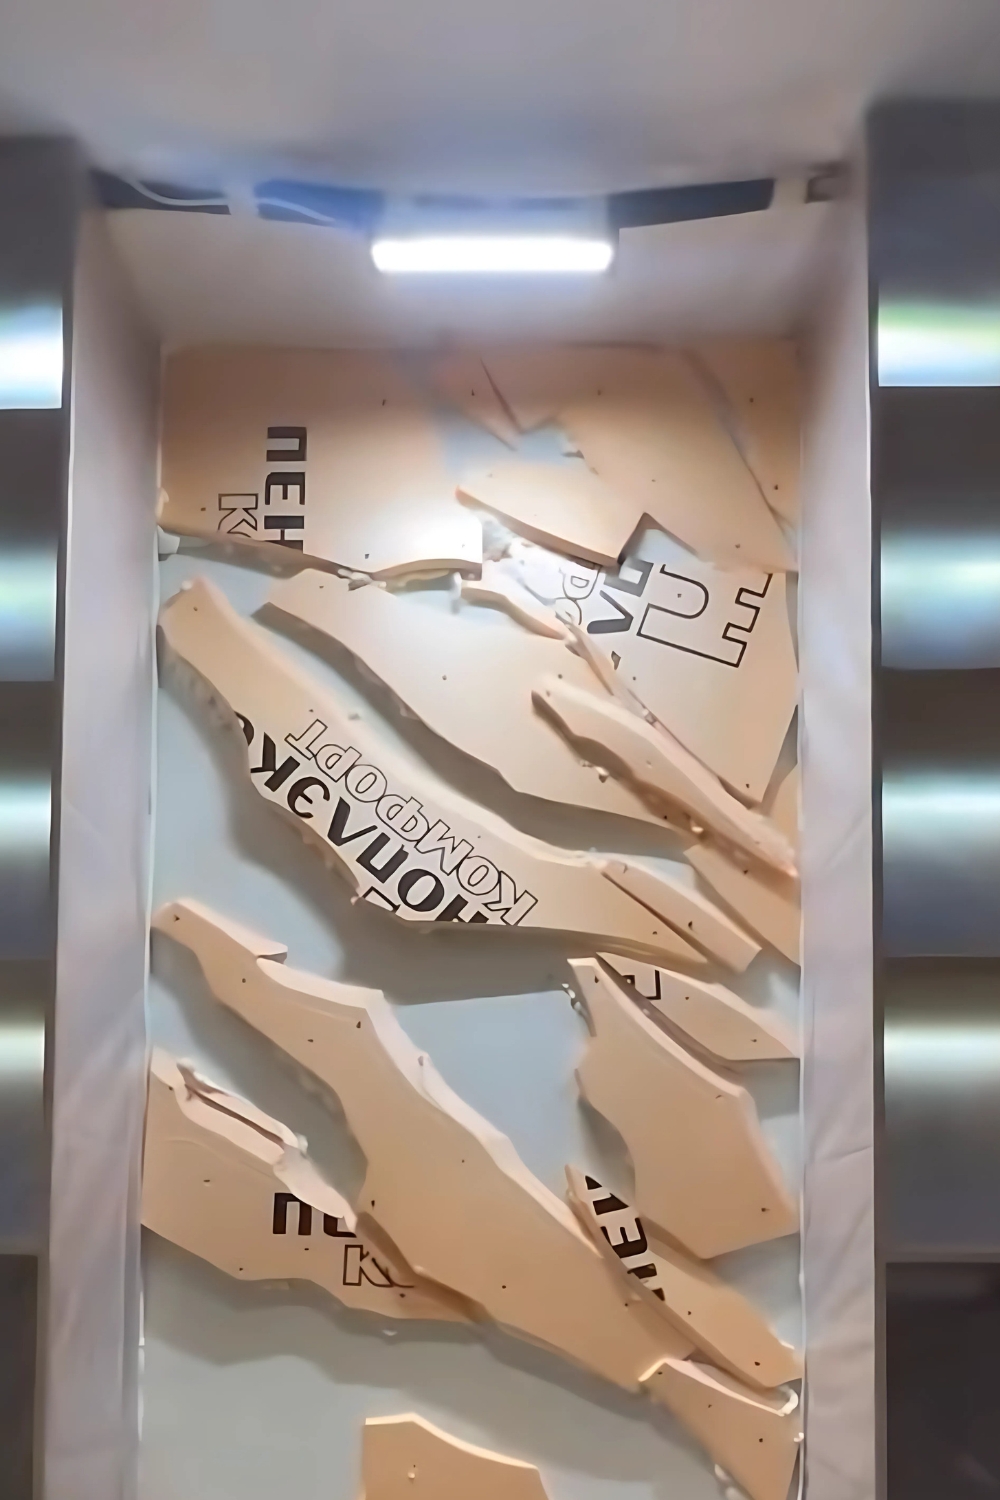
To give you a better idea: The Styrodur pieces should then be partially layered on the wall to achieve a naturalistic rock wall look.
Consider beforehand what your DIY stone wall should ultimately look like. It's best to create a sketch of how you want to attach the Styrodur elements to your living room wall.
Alternatively, you can hold the pieces against the wall as a trial, then outline them there and number both the pieces and their silhouettes on the wall, so you don't have to ponder which element goes where when gluing.
Why is this so important? Because the adhesive you should use to stick the panels usually hardens quickly - within a few minutes.
You therefore have little time to attach the Styrodur panels to the wall. That's why we recommend preparing everything carefully so you don't get unnecessarily stressed.
4. Glue prepared Styrodur pieces to the living room wall
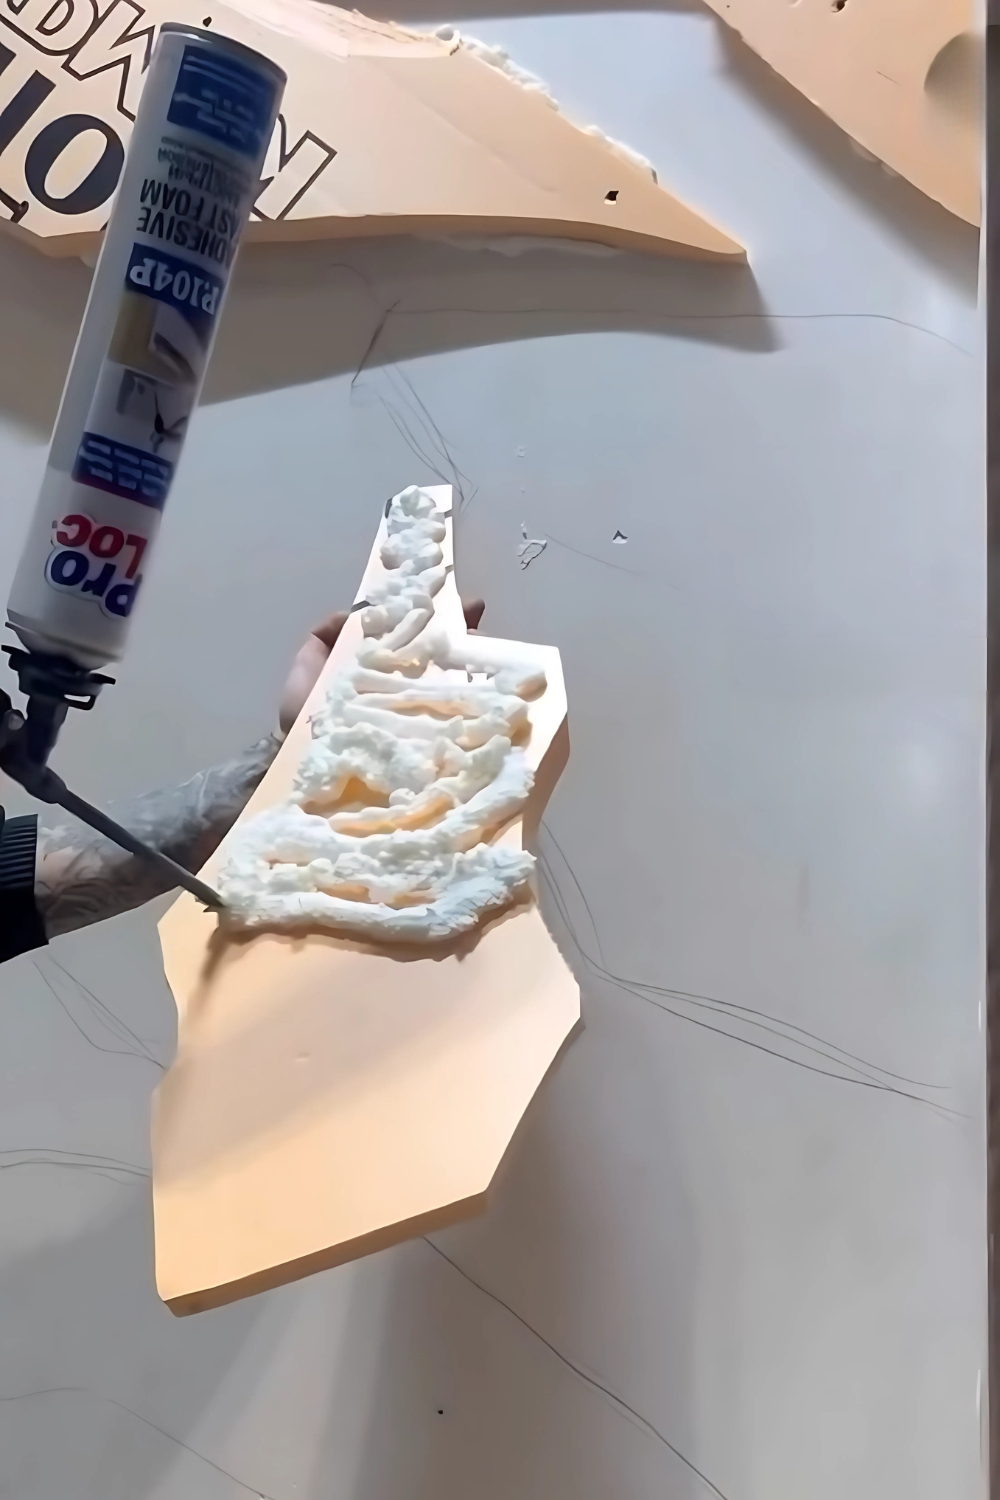
Use fast-curing 2K foam in a pump spray bottle to glue the Styrodur pieces.
To activate, simply follow the manufacturer's instructions. Generally, you need to twist the bottom of the bottle and then shake it so that the hardener reacts with the foam.
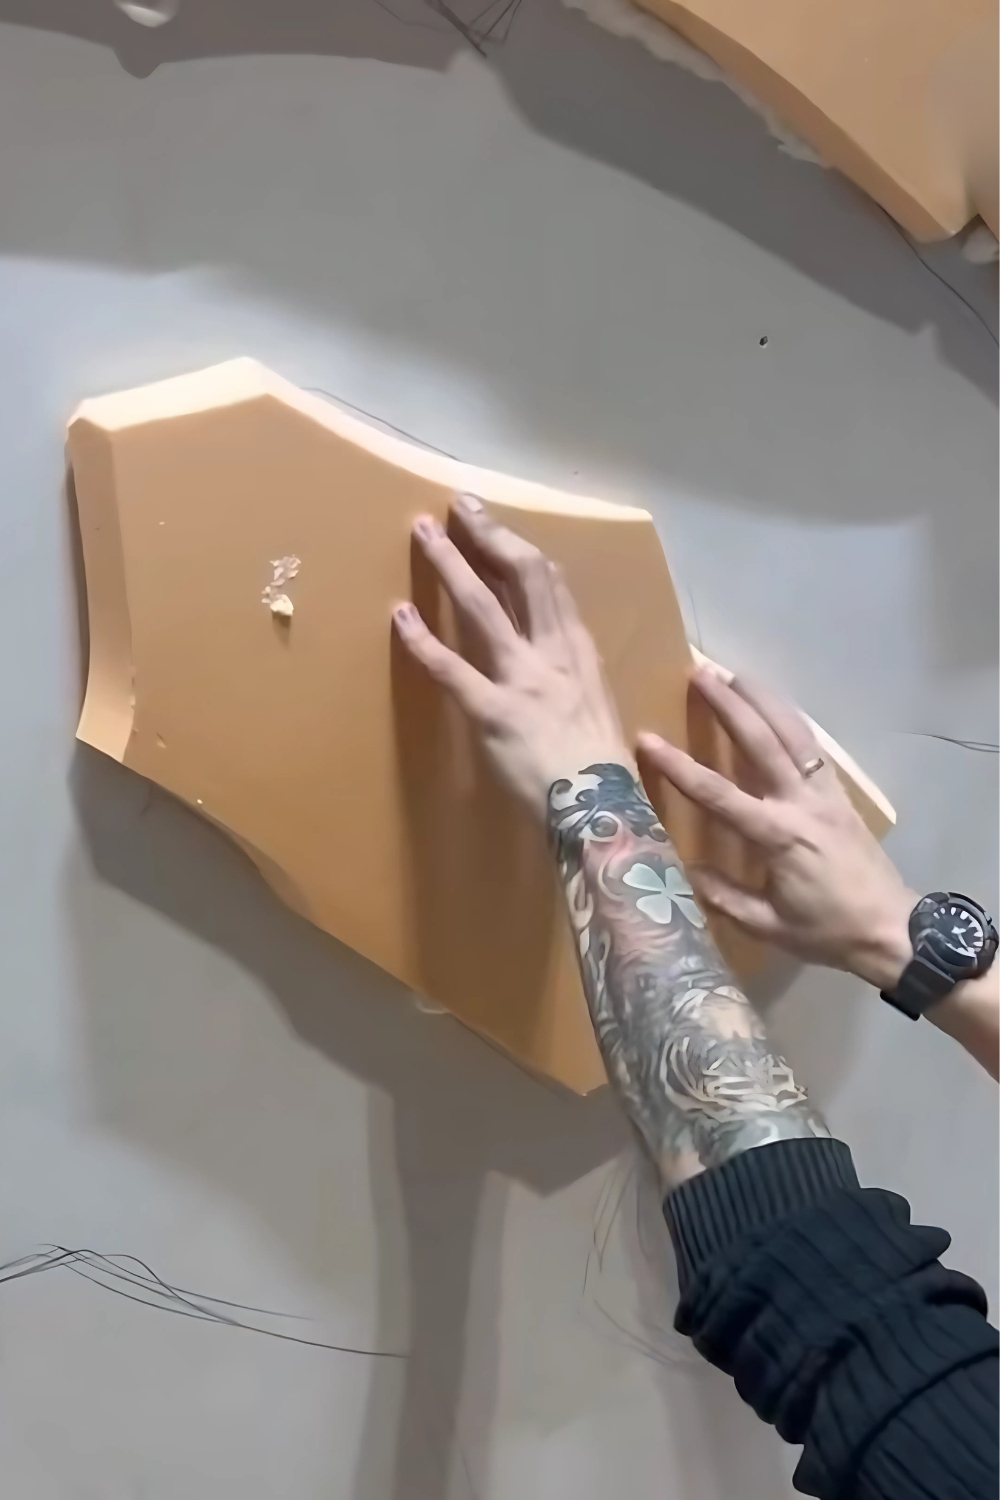
Spray the adhesive in even serpentine lines onto the Styrodur elements and stick them to their designated place on the wall. Proceed step-by-step: spray one piece, stick it to the wall and press firmly for a short time, then repeat the same procedure with the next element - and so on, until all pieces are attached.
5. Process edges and cut cracks
Take the utility knife to refine the edges of the stones a little more accurately. This will make the rough shapes stand out even better later when plastering.
In addition, you can already cut a few fine cracks into the Styrodur pieces. This is also a useful intermediate step towards an appearance that closely resembles natural stone.
6. Fix stones with impact dowels
For each Styrodur panel, insert impact dowels - specifically plate dowels - using a drill and hammer. This ensures that the rock fragments remain reliably on the wall permanently.
Caution:Check beforehand where electrical and possibly water pipes run in the wall. These must not be damaged under any circumstances!
7. Prime the stone wall
Priming the stone wall is one of the most important steps of the entire project. Because without a proper primer, the plaster will not hold.
Use a plaster adhesive primer with a light quartz structure to create a grippy, rough surface. So, specifically look for quartz primer.
The colour of the quartz primer does not matter, as it will not be visible in the end anyway. Depending on the application area, there are different variants - quartz primer for painters is usually white, while tilers often work with blue or pink material. For the stone wall project, you can use any version.
Crucially: Always adhere to the drying time specified by the manufacturer. Do not work wet-on-wet here!
8. Plaster the wall and embed mesh
Next, the wall needs to be plastered, embedding reinforcement mesh to unify the individual Styrodur pieces, so to speak, and to give the stone wall even more strength and stability, preventing cracks from forming in the plaster later.
For plastering, it's best to use smooth tile adhesive. This material can be easily coloured. We will come back to this later - specifically when executing the corresponding step.
Note:Classic lime-cement plaster would also be suitable for plastering, but it is too coarse for colouring. Therefore, to avoid having to work with two different materials, we advise you to opt entirely for tile adhesive.
Mix the adhesive with water according to the manufacturer's instructions. At least initially, limit yourself to a smaller amount to see how the material reacts - just to avoid stress if it hardens relatively quickly.
Tips:
- Wear nitrile gloves when mixing and applying the plaster to protect your skin from burns caused by the cement contained in the adhesive. Caution: If you use an electric mortar mixer, you should not wear smooth, slippery gloves for safety reasons.
- Also wear a dust mask to avoid inhaling potentially harmful cement dust.
- Go outside to mix the adhesive. If this is not possible, you should open all windows indoors and ventilate thoroughly.
The mixture should not be too thin, but also not too thick. It should neither flow nor fall off the trowel, nor crumble. In short: make sure the filler is neither too wet nor too dry.
Apply the material with a smoothing trowel. Start with the intricate corners and edges, then move on to the flat surfaces.
The amount of material and the appearance are not yet relevant at this stage, as long as you maintain a certain uniformity. Feel free to be a bit more generous to be able to embed the mesh well.
Speaking of mesh:To avoid wrinkles in the mesh on the uneven surface of the rock wall, it is best to tear or cut it into small pieces. Always carefully work the mesh pieces along the edge into the crevices and cracks of the wall.
Do not perform this sub-step with a trowel, but rather with your gloved hands. This gives you a better feel for where the indentations are.
Tip: Keep a bucket of water ready to easily wash your gloves regularly while wearing them. You should do this especially before picking up a trowel again. Otherwise, the tool will be smeared, and the cleaning effort at the end will be unnecessarily large.
Note: The mesh only needs to be embedded on the Styrodur pieces, not in areas of the wall that are free of Styrodur. However, always allow it to overlap by about five to ten centimetres at the transition between the panel and the wall to create a stable unit and ensure that the plaster does not crack later.
Explanation: Temperature differences and other influences in the house affect the Styrodur panels and the wall differently, so both may work against each other. The mesh literally covers this potential problem. It prevents cracks from forming anywhere on the stone wall.
Apply more filler over the mesh. Smooth the material on the Styrodur pieces with a pointing trowel.
Tip: For wall areas without Styrodur, it's better to use a notched trowel. This notching makes the surface rougher when hardening, which improves grip and adhesion for the next layer, allowing you to apply more material.
Allow the stone wall to cure for two or three days after the initial plastering.
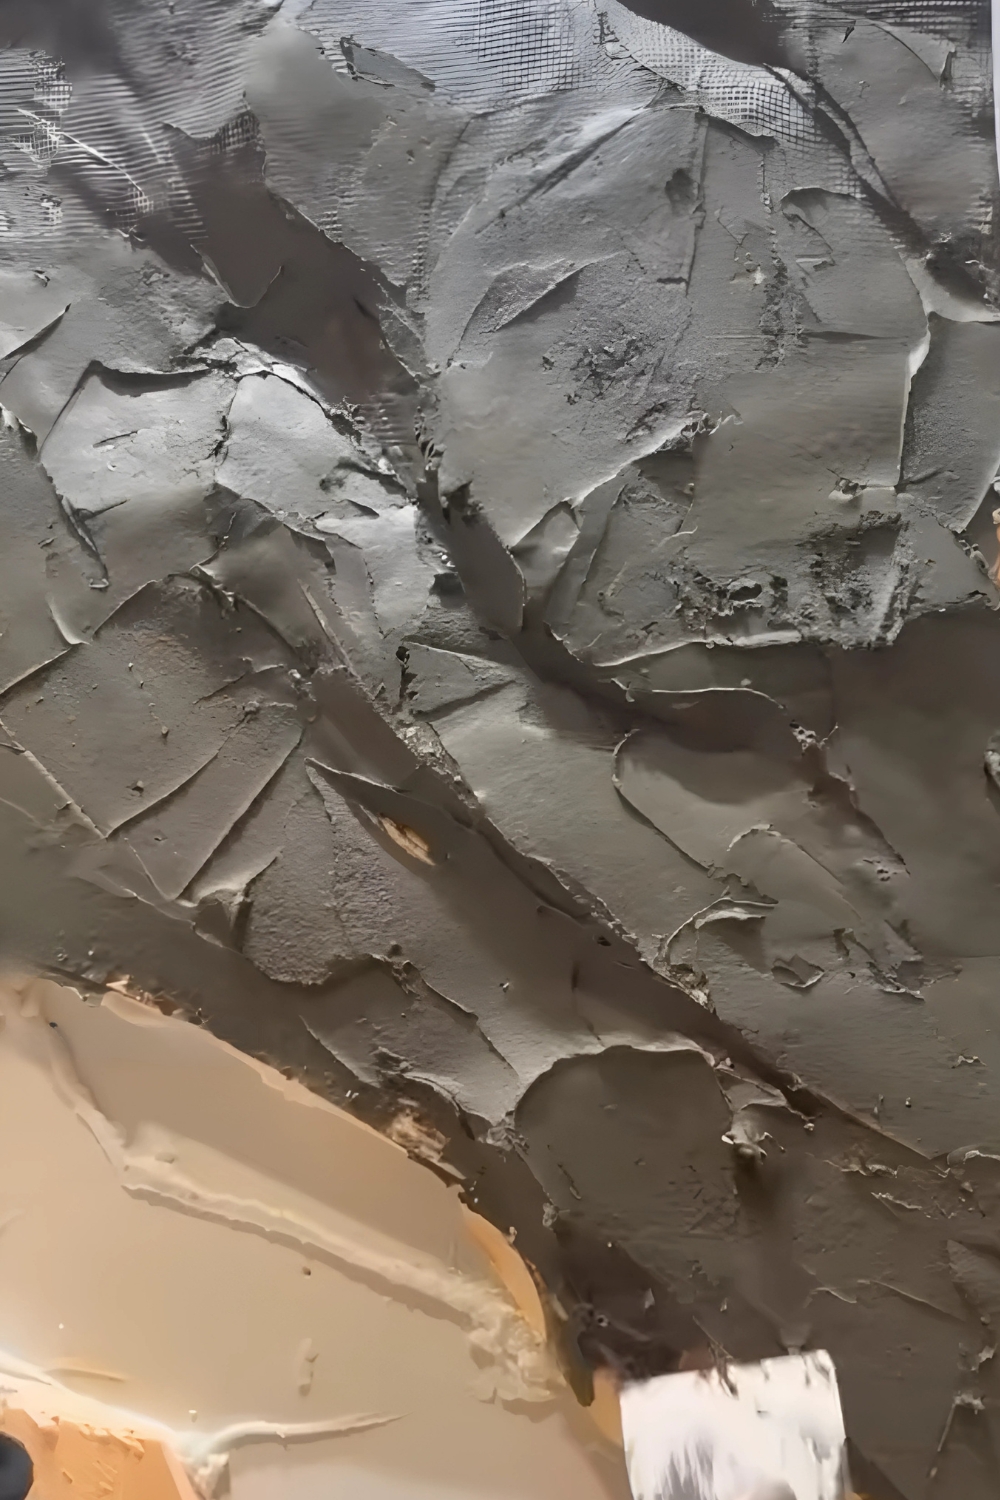
9. Apply coloured filler
The further steps serve to make the Styrodur look more and more like natural stone. First, the aim is to colour the stone wall a little darker.
For this purpose, mix black pigment powder with the tile adhesive you already used for plastering. The dark additive will turn the mixture, which is inherently rather light, dark grey, which is more suitable for an authentic rock face.
Add some pigment powder to a bucket of water and stir it in with a large, flat brush. Proceed slowly and carefully so that the powder does not create dust. Then dissolve the fine clumps in the water with a whisk.
Important: Be sure to work carefully to avoid splashing. The pigment powder is highly colouring - if it gets onto a surface where it shouldn't be, it will be difficult to remove.
Then add the tile adhesive. Stir it in carefully with a whisk. If anything sticks to the edge of the bucket, you can use a trowel to help. Ultimately, everything should be well mixed.
Also add polypropylene fibres. The fibre reinforcement once again serves for stability. It ensures that the mixture on the wall cannot crack.
Without this additive, the evaporation of water would lead to shrinkage of the material, resulting in the formation of small cracks.
Also thoroughly incorporate the fibres, stirring for a long time. Afterwards, the filler is ready to be processed.
Put on gloves again. Then apply the mixture generously. Don't skimp - a decent amount of material on the wall is easier to model with the smoothing trowel without immediately scraping off the substrate again.
Caution: If you mix the material in stages, you should ensure that the mixing ratio with the pigment powder is always exactly the same, otherwise colour differences will result.
Always remove excess material immediately - and always in the same direction, not criss-cross. In this way, you will almost automatically achieve a structure that looks like stone.
However: The rock face does not yet need to be perfectly finished when wet or damp; the fine-tuning comes later.
Allow the filler to dry slightly, but not too much. When you touch the wall, it should no longer rub off, but also not yet be hardened. Once this is ensured, usually after a few hours, you can proceed to the next step.
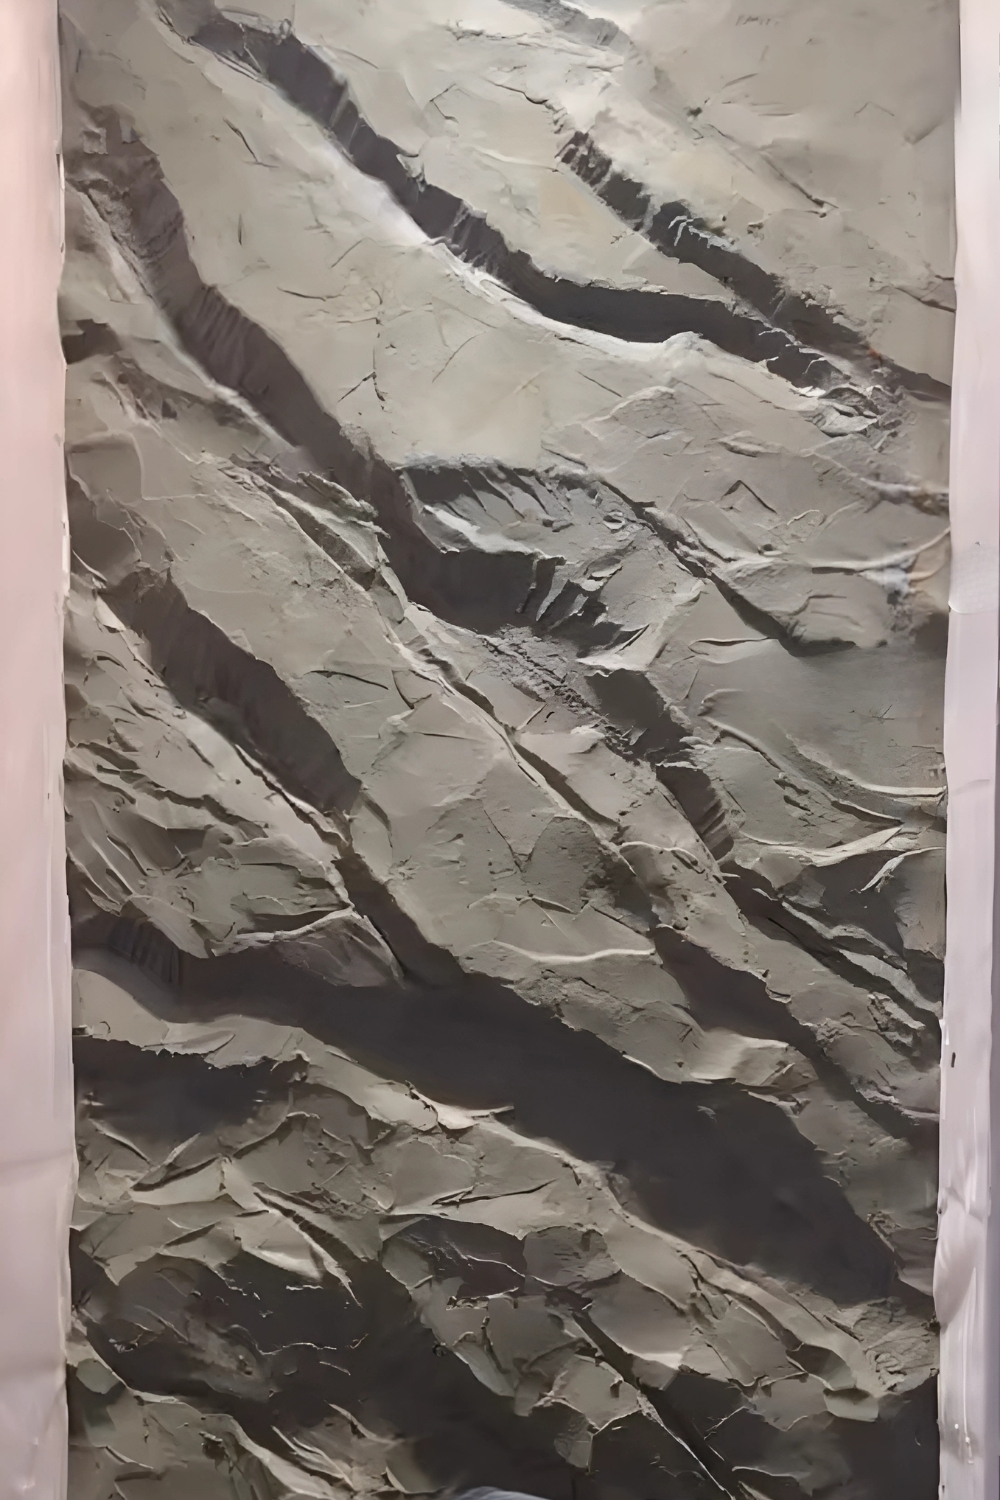
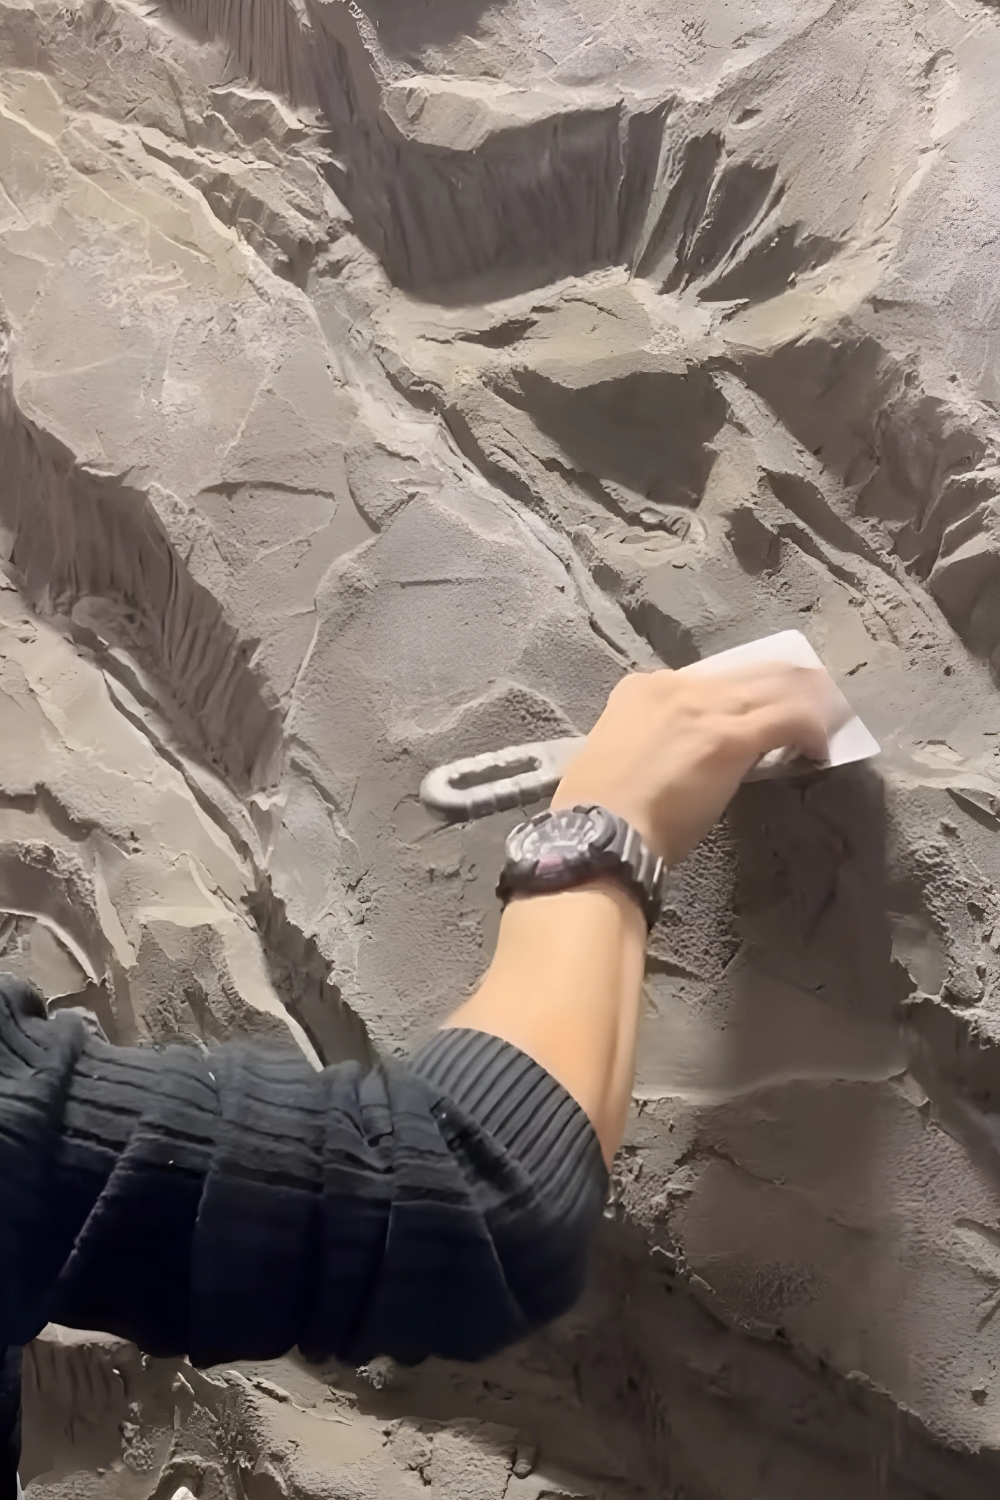
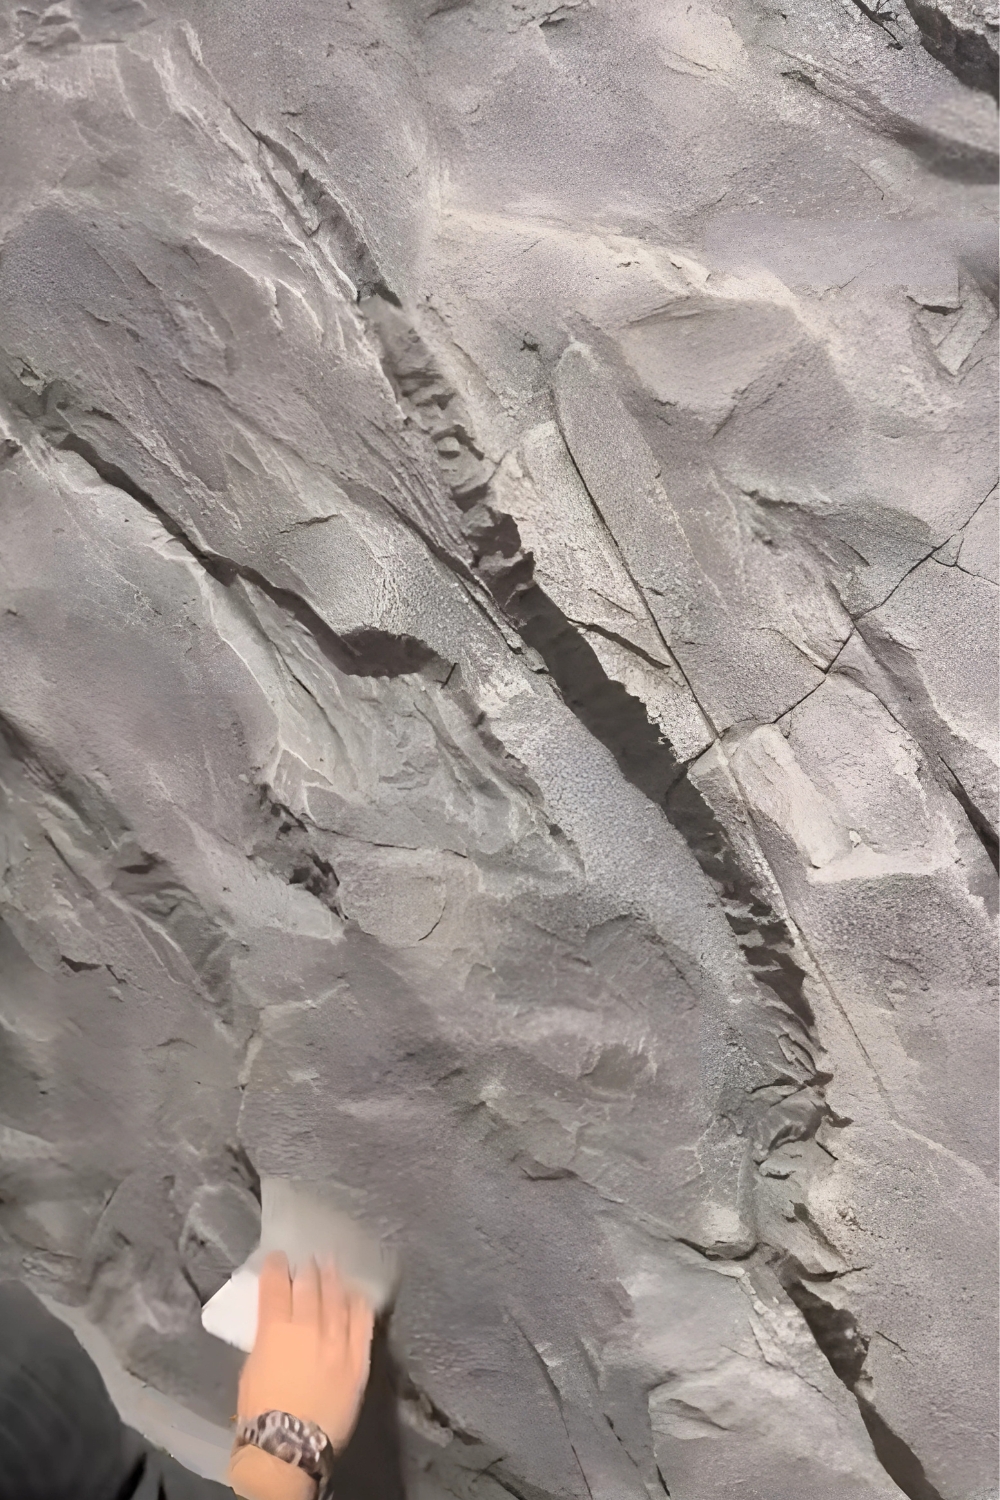
10. Incorporate texture
Now comes the fine-tuning for your DIY stone wall. To incorporate an authentic stone texture, you can use the following utensils:
- Spray bottle with water: Moisten the wall where it is already very dry before texturing it. But always only lightly moisten!
- Small roller: Roll the roller over the surface.
- Hand brush, washing-up brush (plastic, no wire!) or paintbrush: Tap the material with the tool.
This way you create different textures and your rock face looks increasingly realistic.
Repeatedly smooth over the newly textured area with a clean pointing trowel. But don't press too hard; proceed very gently.
This action smooths the material you pulled out with the texturing tool. However, the resulting depressions remain visible, and the stone look takes on more and more shape.
Note: Texturing requires a bit of feel. Don't worry, that comes with practice. We recommend that you first transform a smaller wall - for example, in the hallway or on the terrace - into a rock face before getting creative in the living room. This way, you can gently approach it and gain experience.
Allow your work so far to dry for one day. Afterwards, you can continue the fine work - the stone wall is now ready to be tackled a bit harder. Scratching and carving are on the agenda!
For example, work on the wall with a pointing trowel, a utility knife, a long nail, a plastic washing-up brush, as well as a sanding block with 80-grit sandpaper, 120-grit sanding fleece, and a sanding sponge.
Tip:With the utility knife, you can effectively carve out angular fracture points in the depressions to give your rock face an even more authentic appearance.
Brush away loose crumbs. It is also advisable to lightly go over the entire surface with a sanding block. For the depressions, it is best to use sanding fleece. Ultimately, nothing should protrude, and the surface should feel beautifully smooth when you run your hand over it.
Protruding polypropylene fibres can be removed with a blowtorch. But caution: only flame over them briefly and lightly. Do not let the surface get too hot, as Styrodur panels are not heat-resistant. It's a good thing that the thin, fine fibres burn very quickly anyway.
Once everything is textured and smoothed as desired, you can take a break for two to three days. During this time, your stone wall will cure.
11. Apply deep primer (with colour)
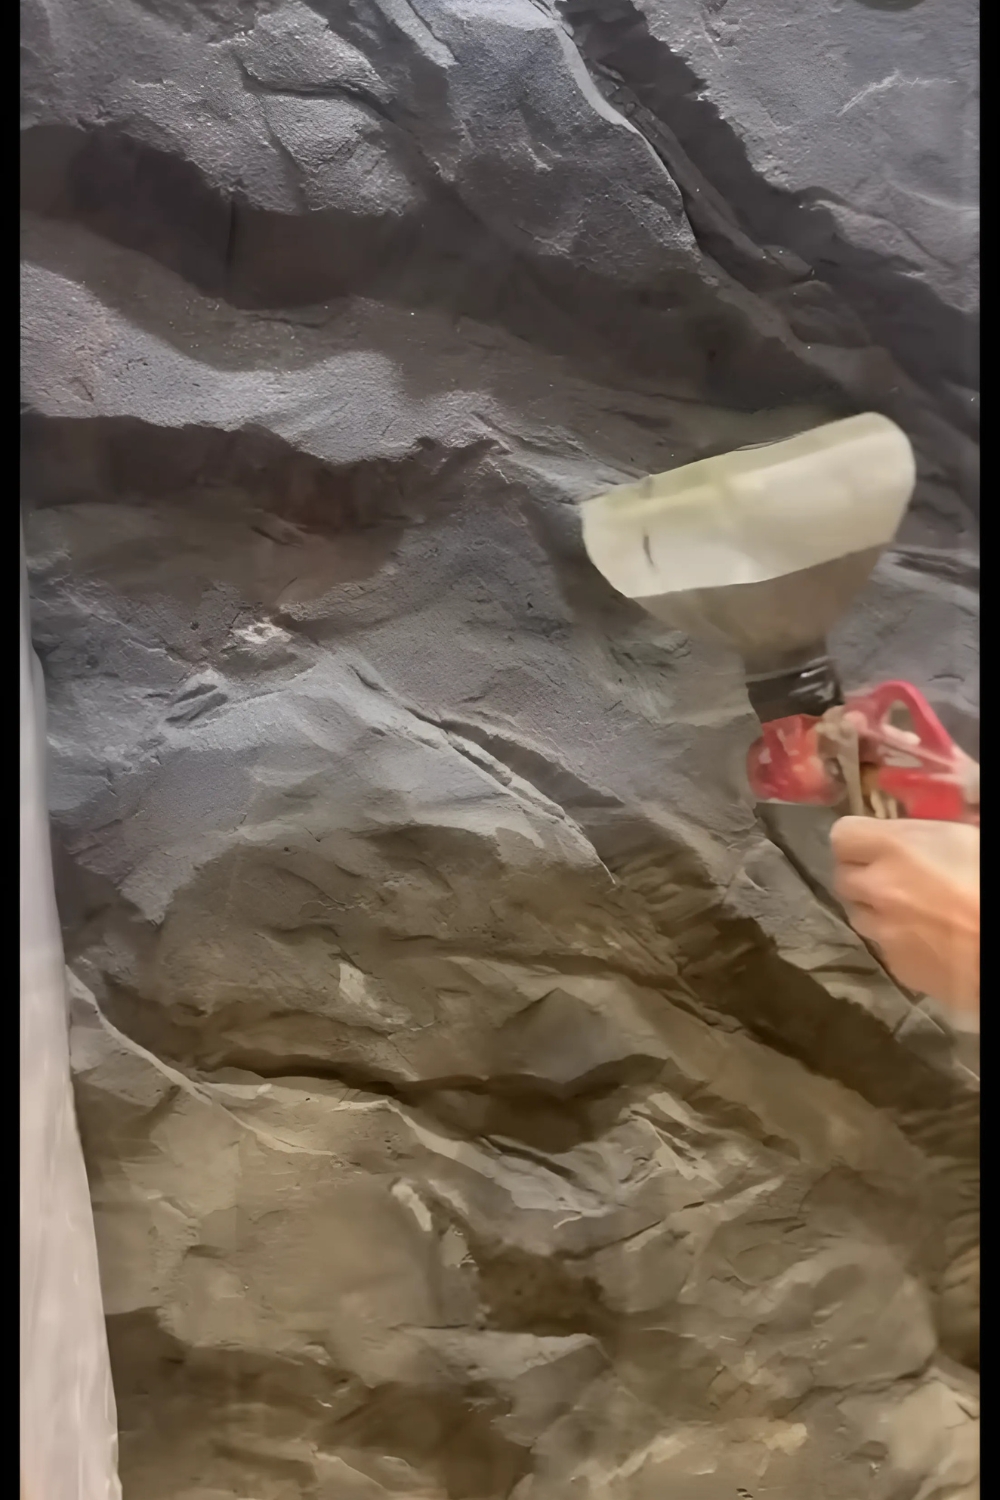
Your living room rock face is almost finished. Before moving on to the final steps, you should apply deep primer. Mixing ratio: water 60 percent, deep primer 40 percent - and dark acrylic paint as needed, depending on how dark you want your stone wall to be in the end.
Pour the mixture into a robust pump bottle and spray the wall generously - and evenly - with it, to further stabilise it on the one hand and to colour it darker on the other.
It doesn't matter if the liquid runs down the wall a little. So don't be sparing and apply several layers to thoroughly colour the stones.
Allow the deep primer to dry for one day.
Tip: Clean the pump bottle immediately after each use, especially the nozzle. The longer you wait, the more difficult cleaning becomes. Deep primer is very sticky and can clog the nozzle.
12. Lighten elevations
This step merely serves to make the rock face even more realistic. It is therefore optional.
Sand over the elevations once more. This slightly reopens the previously applied deep primer there and makes the surface more absorbent.
Explanation: Deep primer reduces the absorbency of the surface. In the scraped areas, it is slightly more absorbent. Thus, the different areas absorb the subsequent sealant to varying degrees, causing the colour gradations on the wall to vary - for an even more authentic result.
Note: Sanding will, of course, make fibres visible again, which you can burn off with a blowtorch. Simply vacuum up any dust created.
13. Seal the stone wall in the living room
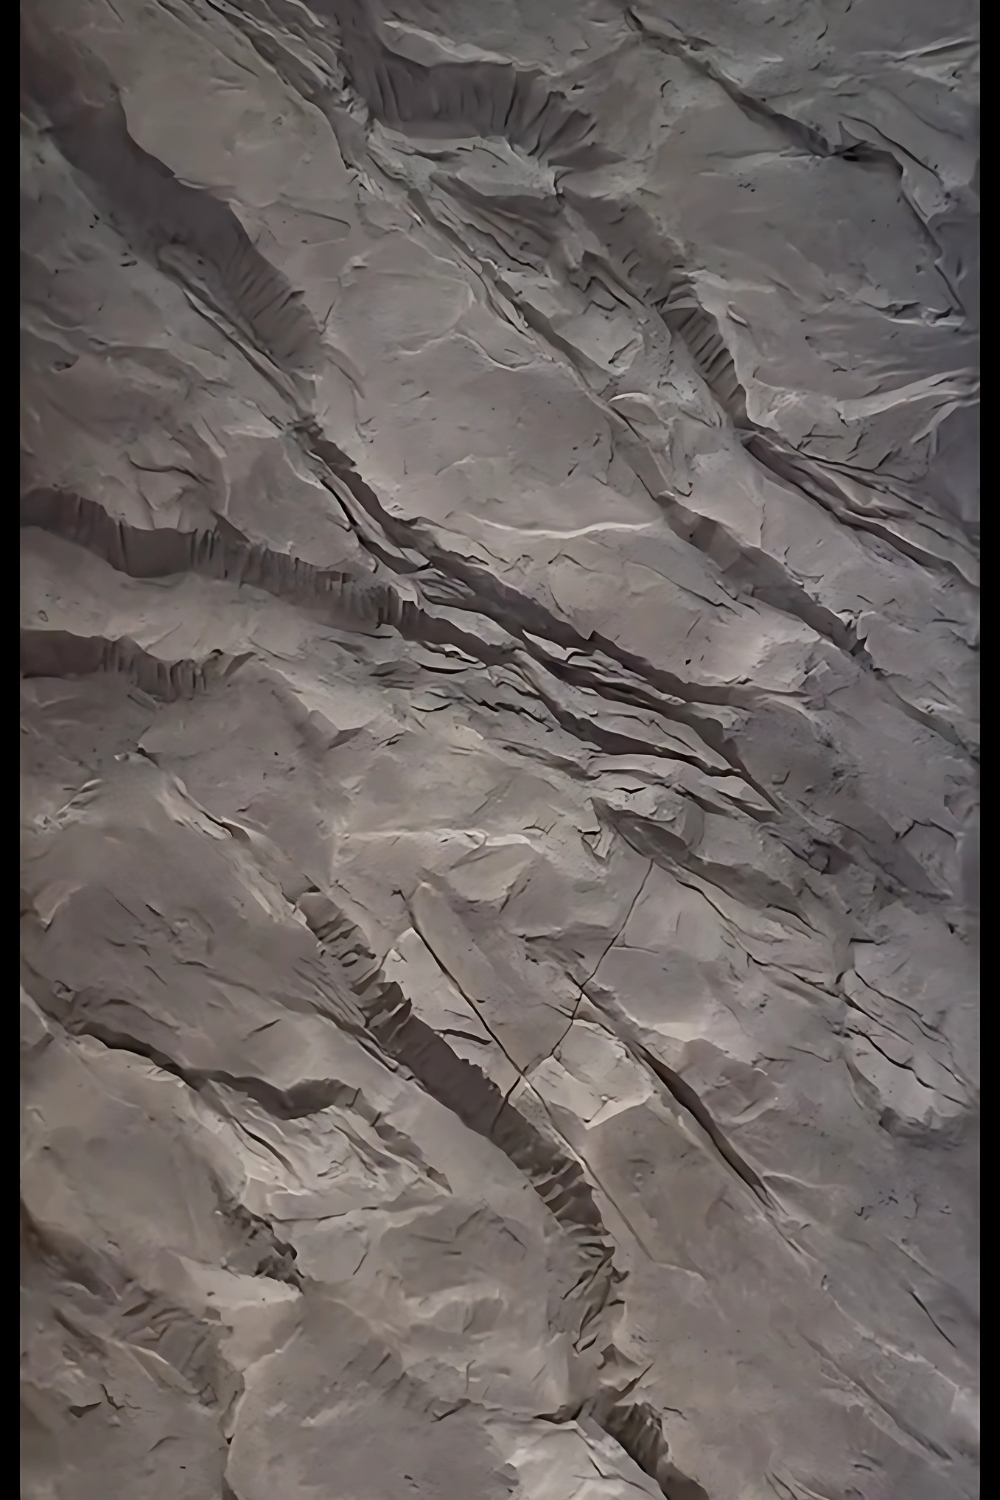
Seal your DIY stone wall in the living room with slightly glossy acrylic binder. The subtle sheen gives the wall a noble, high-quality touch. However, the acrylic binder should not be too glossy, otherwise the result will look too unnatural.
Note: Acrylic binder is actually intended for sealing canvases (acrylic paintings), but it is also suitable for this project to not only visually enhance the rock face but also make it easier to maintain. Because with the sealing, dusting is effortless. It is sufficient to vacuum the stone wall quarterly to semi-annually.
Put on nitrile gloves. Dilute the acrylic binder with water in a 50/50 mixing ratio. Pour the liquid back into the pump bottle to apply it efficiently by spraying evenly.
Do not spray too much. Simply dab off any excess with a lint-free cloth. You can spread the material well with a clean brush or hand brush.
Apply three layers of sealant. The first two do not need to dry completely; wait about an hour each time and then continue working wet-on-wet - this is not a problem here.
After the last coat, you can sit back and relax and let the sealant dry completely. Your DIY stone wall in the living room is finished - enjoy your masterpiece!
One last tip: Do you want a weathered surface for even more naturalness? Then patinate a few elevations with a black and white acrylic paint-acrylic binder mixture to lighten them slightly and enhance the colour differences. But don't overdo it!
Material and Tool List
- Adhesive tape
- Foil
- Protective fleece
- Styrodur panels
- 2K foam
- Plate dowels
- Drill
- Hammer
- Utility knife
- Quartz primer
- Reinforcement mesh
- Tile adhesive
- Smoothing trowel
- Notched trowel
- Pointing trowel
- Nitrile gloves
- Dust mask
- Mortar mixer
- Whisk
- Black pigment powder
- Polypropylene fibres
- Pump bottle
- Brush
- Sanding tools
- Scratching tools
- Hand brush
- Blowtorch
- Deep primer
- Acrylic binder
- Black and white acrylic paint (optional)
Here you can find the complete video tutorial:
Credit Instagram: sultanoff.decor Youtube Shorts Link: Watch here

Mira Celini
Interior Designer at LivareaAs an interior designer at Livarea – since 2012 one of Germany's leading online shops for designer furniture – I help customers create their dream homes. My tips come straight from practice: honest, inspiring, and always with an eye for the extraordinary.
→ View all Trendblog articles